Itt Az Új Ubuntu, Avagy „Groovy Gorilla”

2020 október 22-én megjelent az Ubuntu 20.10, melyet a készítők Groovy Gorilla-ra kereszteltek. Az eget rengető új funkciók helyett ez a kiadás inkább az apró változtatásokra és javításokra koncentrál. Fontos említeni azt is, hogy köztes kiadásként nincs rá LTS, avagy hosszú távú támogatás. Főleg kísérletező hajlamúaknak ajánljuk. Nézzük, hogy mik benne az újdonságok!

Az Ubuntu továbbra is a legnépszerűbb Linux disztró, a legújabb verzió pedig letölthető és kipróbálható. Mivel két évente jön csak ki LTS, avagy hosszú távon is támogatott kiadás, a Groovy Gorilla egy amolyan köztes állapot és nem lesz sokáig hivatalosan támogatott. Ezek a köztes verziók 6 havonta jelennek meg, és a Gorilla is ilyen. A köztes kiadások azért jók, mert az LTS-be szánt funkciókat tesztelhetik bennük a fejlesztők, és a felhasználók adhatnak visszajelzést is.
A legrégebbi LTS verzió az Ubuntu 20.04 volt, mely anno a „Focal Fossa” nevet kapta, és ez 2025-ig támogatva lesz. A Gorilla az első kör az új ötletekben, melyek a következő LTS-ben megjelenhetnek stabil formában.
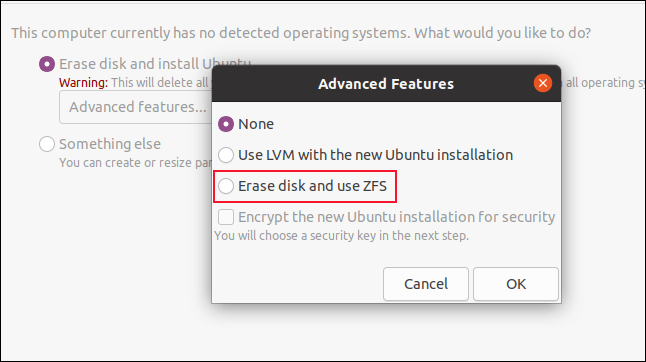
Az Ubuntu telepítője a 20.04 óta nem változott jelentős mértékben. Az egyetlen jól észrevehető változtatás a „Haladó”, avagy Advanced fülben található a telepítés során. Lehetőség volt ugyanis használni telepítéskor a ZFS fájlrendszert, de eddig oda volt írva mellé, hogy kísérleti stádiumban van (experimental). Ez a jelző most eltűnt, és a ZFS már teljesen stabilnak tűnik. A ZFS mindenesetre nem az átlagfelhasználónak kell, így érdemes a megszokott fájlrendszert használni.
Miután végez a telepítő, az asztalon meg is pillantjuk a Groovy Gorilla logót, tehát egy napszemüveges gorillát. Egész menőn néz ki. Pont annyira, mint a GNOME asztali környezet, mely szintén kapott egy kis felturbózást, ezzel pedig már a 3.38.0 verziónál járunk. Általánosságban koherensebbek lett az applikációk külseje és elrendezése. Az „Alkalmazások” rácsnál eddig két nézet között lehetett választani. Volt „frequent”, avagy gyakori és „all”, avagy összes. Az új GNOME-al ez egységesítve lett egy testreszabható rácsos felületbe, és ezáltal könnyebb szortírozni kedvenc alkalmazásainkat.
Az alkalmazások sorrendjét szabadon alakíthatjuk úgy, hogy lenyomva tartjuk a bal egérgombot és húzzuk őket. Régen kényszerített ABC sorrendben jelentek meg az app-ok, de ez is a múlté.
A következő részben megnézünk még pár apróságot, amit érdemes az új GNOME-ról és az Ubuntu-ról tudni.
A GNOME újítások között a legjobb talán az volt, hogy az alkalmazások nézete egységesült, továbbá teljes mértékben elrendezhetjük az alkalmazásokat igény szerint. Régóta kért funkció volt az is, hogy az alkalmazások ikonjai legyenek kicsit jobban tudatában a képernyőnek és a felbontásnak. Az ima meghallgatásra talált, ugyanis a 20.10-es Ubuntu-ban az ikonok mérete sokkal jobban összelőhető a felbontással és a képernyővel. Ami még hasznos, hogy ha ráhúzunk egy ikont egy másikra, akkor a rendszer csoportba rendezi őket!

Az Ubuntu naptár már így is elég jól használható volt. Semmi csicsa, csak ami kell. A Groovy Gorilla-ban annyi extra jön a naptárhoz, hogy egy napra rákattintva a naptár ablak alján megjelennek az adott napra tervezett programok. Ez hasznos, mivel nem kell más oldalra, ablakba navigálni, hogy megtekintsük terveinket. Két kattintás és már látjuk is.
A wifi hotspot konfigurálása is egy kicsit egyszerűbb lett az új frissítésben. A „Settings”, avagy Rendszerbeállítások szekcióban rá kell csak kattintani a „Wifi” fülre, ahol laptopunkból vagy gépünkből azonnal hotspot-ot csinálhatunk. A képernyőn megjelenik egy QR kód, melyet szkennelhetünk telefonnal vagy tablettel és már csatlakoztunk is a hotspot-hoz. Hasznos, ha haveroknak szeretnénk gyorsan netet adni kávézóban, otthon, stb.

Az Ubuntu 20.10 megjelenésével a hivatalos Linux Kernel verziója is frissült 5.8.0-20-ra. Szokás szerint itt is történt pár fejlesztés, főleg jobb támogatottság terén modern hardverek felé. A Qualcomm Adreno, Intel Tiger Lake és Radeon processzorok driverein javítottak kicsit a fejlesztők, továbbá mostantól az AMD GPU Trusted Memory Zone is támogatottnak számít. Bekerültek a kernelbe az AMD Energy driverek és az Intel Tiger Lake System Agent Geyserville (SAGV) támogatottság is, tehát látható, hogy a modern processzorok sem ütköznek akadályba.
Problémák voltak korábban az EXT4 fájlrendszerrel is, és ezeket a fejlesztők ebben a frissítésben kijavították. A népszerű Btrfs fájlrendszer funkcióit is felturbózták egy kicsit, ugyanis a későbbi kiadásokban néhány disztró (például a Fedora 33) alapértelmezett módon ezt fogja használni.
Linux Lite 5.0

This is the first release in Series 5.x See below for more information.
UEFI/LEGACY ISO: linux-lite-5.0-64bit.iso
MD5SUM: 21c7b2aa0eaf7ae60e3c14b491d7e408
SHA256: abba007adf5420bd3845dad7b43052a40874f31394d142ea740cc8f27aeec538
SIZE: 1.4GB – DVD/USB
LIVE USER: Login to the live desktop is automatic
BASE: Ubuntu 20.04 LTS
MINIMUM RECOMMENDED SPECIFICATIONS:
CPU: 1Ghz processor
RAM: 768mb ram
STORAGE: 8gb
RESOLUTION: VGA screen 1024×768 resolution
MEDIA: DVD drive or USB port for the ISO image
PREFERRED SPECIFICATIONS:
CPU: 1.5GHz processor
RAM: 1024mb ram
STORAGE: 20gb
RESOLUTION: VGA, DVI or HDMI screen 1366×768
MEDIA: DVD drive or USB port for the ISO image
INFORMATION
Standard package list and more details here.
Check out our hardware database here.
How do I put Linux Lite on a DVD or USB? Click here.
How do I download with BitTorrent? Click here.
Download BitTorrent for Windows or Mac here. Linux users here.
BUY MEDIAGet a personalized copy of Linux Lite on DVD or USB.
Want a personalised DVD or a stylish USB key with Linux Lite already loaded? Click here to visit our Secure Online Shop and choose from a range of products. Thank you for your support.

UEFI/Secure Boot
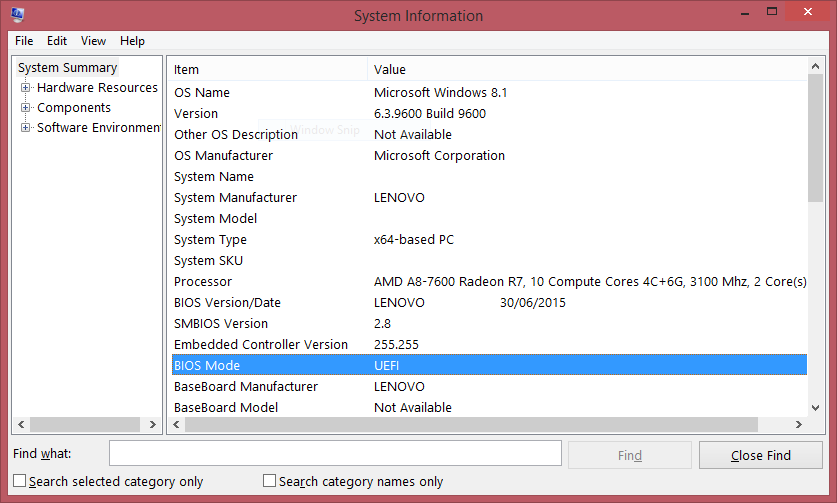
In Windows Search, type msinfo or msinfo32 and launch the desktop app named System Information. Look for the BIOS Mode item, and if the value for it is UEFI, then you have the UEFI firmware. If it says BIOS Mode Legacy, then that’s the firmware you’re running. Also, in general, UEFI-enabled machines have faster startup and shutdown times as compared to BIOS-Legacy machines. If you bought the computer/motherboard after 2010, chances are you have a UEFI system. If you are still unsure, download the UEFI version as it will also detect and run on a BIOS-Legacy computer.
It is highly recommended that you turn off Secure Boot or you will have a far less enjoyable computing experience. To disable Secure Boot, see here.
RELEASE ANNOUNCEMENT
Linux Lite 5.0 Final is now available for download and installation with full UEFI support. This is the most feature rich, complete Linux Lite release to date. This is the release many people have been waiting for. Linux Lite makes the transition to a linux based operating system by offering a full, Microsoft compatible Office suite, familiar software like Firefox, Chrome, Teamviewer, VLC as well as full system back up tools, a comprehensive – easy to follow Help Manual to guide you on your journey, Steam so you can keep playing your Windows games and so much more familiar software. Our Desktop is laid out just like it is in Windows with a Start Menu to the left and a tray to the right with Volume, Network and Calendar options. See below for What’s New.
Read the full announcement here.
COMMON SOFTWARE
Web Browser – Firefox 76.0.1
Email Client – Thunderbird 68.8.0
Office Suite – LibreOffice 6.4.3.2
Media Player – VLC 3.0.9
Image Editor – Gimp 2.10.18
System Backup and Restore – Timeshift 20.03
File Manager – Thunar 1.8.14
Base: 20.04
Kernel: 5.4.0-33 (custom kernels are also available via our Repository for versions 3.13 – 5.7)
Series: 5.x
DESKTOP UI
Window Theme: Adapta
Icon Theme: Papirus
Font: Roboto Regular
WHAT’S NEW
UEFI is now supported
GUFW has been replaced by the highly configurable FirewallD
Integrity Check during live boot
No hidden telemetry
HiDPI – 4 x Settings
New Updater notifier
Mousepad replaces Leafpad
Paint now added to Accessories
XFCE Screensaver included
Zim replaces unsupported CherryTree as the note taker in Lite Software
Google Chrome has been added to Lite Software
NitroShare has been added to Lite Software
Lite Welcome (shortcuts now work) and Lite User Manager now updated to GTK3 and Python3
New Logout options
OEM installer for retailers and manufacturers (Legacy and UEFI)
Firewall status added to Lite Widget
Language choice included on Login screen
Dual architecture support
New Wallpapers
All Lite applications updated to new code base
Minor bug fixes and improvements
CURRENT RELEASE
If you are writing the ISO to a USB on Windows, Mac or Linux, you need use Etcher – https://www.balena.io/etcher/ We only support Etcher as it has shown to be the most reliable in our testing.
Linux or Mac command line:
Yumi, Multiboot and other multi-boot applications are not supported. If you do use unsupported third party software to burn Linux Lite to a USB, try logging in with ubuntu as the username and password, or just as the username, no password.
If the screen locks during Live mode, type linux or one of the above usernames into the user box and click on the Login button (no password required)
Linux Lite 5.0 64bit – 1st June, 2020
FILENAME: linux-lite-5.0-64bit.iso
SIZE: 1.4GB – DVD, USB
MD5SUM: 21c7b2aa0eaf7ae60e3c14b491d7e408
SHA256: abba007adf5420bd3845dad7b43052a40874f31394d142ea740cc8f27aeec538
HTTP MIRRORS: Click here
TORRENT HASH: d3b3735500e7ee77dab3fcc3144498176fdde951
LIVE USER: Login to the live desktop is automatic
DOWNLOAD 64bit
There will be no 32bit ISO from Series 4.x onwards. If you still need to run a 32bit operating system, our Series 3.x is supported until April, 2021. Download it from here.
UPGRADING
To upgrade from within a Series, click on Menu, Favorites, Install Updates (you must reboot if prompted to) then Menu, Settings, Lite Upgrade.
There is no upgrade path to or from RC releases.
There is no upgrade path from Series to Series.
RELEASE TIMES
Linux Lite releases are announced and ready 12AM New Zealand Time on the 1st of that months release date.
Other time zones:
Australia, Perth – 8PM (31st)
Brazil – Rio de Janeiro – 9AM (31st)
Canada – Montreal – 8AM (31st)
China – Beijing – 7PM (31st)
Finland, Helsinki – 1PM (31st)
France, Paris – 2PM (31st)
India, Mumbai – 5.30PM (31st)
Israel, Tel Aviv – 3PM (31st)
Japan, Tokyo – 9PM (31st)
Kuwait, Kuwait City – 3PM (31st)
Australia, Sydney – 10PM (31st)
Pakistan, Lahore – 5PM (31st)
Russia, Moscow – 3PM (31st)
South Africa, Cape Town – 2PM (31st)
Spain, Madrid – 2PM (31st)
United Kingdom, London – 1PM (31st)
United Arab Emirates, Dubai – 4PM (31st)
USA, New York – 8AM (31st)
ROADMAP
The release schedule for Linux Lite.
Linux Lite 5.8 Release – 1st February 2022 (End of Support April 2025)
Linux Lite 5.6 Release – 1st September 2021
Linux Lite 5.4 Release – 1st April 2021
Linux Lite 5.2 Release – 1st November 2020
Linux Lite 5.0 Release – 1st June 2020
Linux Lite 4.8 Release – 14th January 2020 (End of Support April 2023)
Linux Lite 4.6 Release – 1st September 2019
Linux Lite 4.4 Release – 1st April 2019
Linux Lite 4.2 Release – 1st November 2018
Linux Lite 4.0 ‘Diamond’ Release – 1st June 2018
Linux Lite 3.8 Release – 1st February 2018 (End of Support April 2021)
Linux Lite 3.6 Release – 1st September 2017
Linux Lite 3.4 Release – 1st April 2017
Linux Lite 3.2 Release – 1st November 2016
Linux Lite 3.0 ‘Citrine’ Release – 1st June 2016
Linux Lite 2.8 Release – 1st December, 2014 (End of Support April 2019)
Linux Lite 2.6 Release – 1st April, 2015
Linux Lite 2.4 Release – 1st September, 2015
Linux Lite 2.2 Release – 1st February, 2016
Linux Lite 2.0 ‘Beryl’ Release – 1st June, 2014
Focal Fossa

Introduction
These release notes for Ubuntu 20.04 LTS (Focal Fossa) provide an overview of the release and document the known issues with Ubuntu 20.04 LTS and its flavors. For details of the changes applied since 20.04, please see the 20.04.1 change summary. The release notes for 20.04 are available as well.
Support lifespan
Maintenance updates will be provided for 5 years until April 2025 for Ubuntu Desktop, Ubuntu Server, Ubuntu Cloud, and Ubuntu Core. All the remaining flavours will be supported for 3 years. Additional security support is available with ESM (Extended Security Maintenance).
Official flavor release notes
Find the links to release notes for official flavors here.
Get Ubuntu 20.04.1 LTS
Download Ubuntu 20.04.1 LTS
Images can be downloaded from a location near you.
You can download ISOs and flashable images from:
https://releases.ubuntu.com/20.04/ (Ubuntu Desktop and Server for AMD64)
http://cdimage.ubuntu.com/ubuntu/releases/20.04/release/ (Less Frequently Downloaded Ubuntu Images)
http://cdimage.ubuntu.com/ubuntu-legacy-server/releases/20.04/release/ (Less Frequently Downloaded Ubuntu Images)
http://cloud-images.ubuntu.com/daily/server/focal/current/ (Ubuntu Cloud Images)
http://cdimage.ubuntu.com/kubuntu/releases/20.04/release/ (Kubuntu)
http://cdimage.ubuntu.com/lubuntu/releases/20.04/release/ (Lubuntu)
http://cdimage.ubuntu.com/ubuntu-budgie/releases/20.04/release/ (Ubuntu Budgie)
http://cdimage.ubuntu.com/ubuntukylin/releases/20.04/release/ (Ubuntu Kylin)
https://ubuntu-mate.org/download/ (Ubuntu MATE)
http://cdimage.ubuntu.com/ubuntustudio/releases/20.04/release/ (Ubuntu Studio)
http://cdimage.ubuntu.com/xubuntu/releases/20.04/release/ (Xubuntu)
Upgrading from Ubuntu 18.04 LTS or 19.10
You can upgrade to Ubuntu 20.04 LTS from either Ubuntu 18.04 LTS or Ubuntu 19.10.
Ensure that you have all updates installed for your current version of Ubuntu before you upgrade.
Confirm that you also have a network connectivity to one of the official mirrors or to a locally accessible mirror as there are no offline upgrade options.
To upgrade on a desktop system:
Open the “Software & Updates” Setting in System Settings.
Select the 3rd Tab called “Updates”.
Set the “Notify me of a new Ubuntu version” drop down menu to “For any new version” if you are using 19.10; set it to “For long-term support versions” if you are using 18.04 LTS.
Press Alt+F2 and type update-manager -c into the command box if you are using 19.10; type update-manager -c -d if you are using 18.04 LTS.
Update Manager should open up and tell you that Ubuntu 20.04 LTS is now available.
Click Upgrade and follow the on-screen instructions.
To upgrade on a server system:
Install update-manager-core if it is not already installed.
Make sure the Prompt line in /etc/update-manager/release-upgrades is set to ‘normal’ if you are using 19.10, or ‘lts’ if you are using 18.04 LTS.
Launch the upgrade tool with the command sudo do-release-upgrade on 19.10; use sudo do-release-upgrade -d if you are using 18.04 LTS.
Follow the on-screen instructions.
Note that the server upgrade will use GNU screen and automatically re-attach in case of dropped connection problems.
The -d switch is necessary to upgrade from Ubuntu 18.04 LTS as upgrades have not yet been enabled and will only be enabled after the first point release of 20.04 LTS.
Users of the i386 architecture will not be presented with an upgrade to Ubuntu 20.04 LTS. Support for i386 as a host architecture was dropped in 19.10.
As with every Ubuntu release, Ubuntu 20.04 LTS comes with a selection of the latest and greatest software developed by the free software community.
Ubuntu 20.04 LTS is based on the long-term supported Linux release series 5.4. Notable features and enhancements in 5.4 since 5.3 include:
Support for new hardware including Intel Comet Lake CPUs and initial Tiger Lake platforms, AMD Navi 12 and 14 GPUs, Arcturus and Renoir APUs along with Navi 12 + Arcturus power features.
Support has been added for the exFAT filesystem, virtio-fs for sharing filesystems with virtualized guests and fs-verity for detecting file modifications.
Built in support for the WireGuard VPN.
Enablement of lockdown in integrity mode.
Other notable kernel updates to 5.4 since version 4.15 released in 18.04 LTS include:
Support for AMD Rome CPUs, Radeon RX Vega M and Navi GPUs, Intel Cannon Lake platforms.
Support for raspberry pi (Pi 2B, Pi 3B, Pi 3A+, Pi 3B+, CM3, CM3+, Pi 4B)
Significant power-saving improvements.
Numerous USB 3.2 and Type-C improvements.
A new mount API, the io_uring interface, KVM support for AMD Secure Encrypted Virtualization and pidfd support.
Boot speed improvements through changing the default kernel compression algorithm to lz4 (in Ubuntu 19.10) on most architectures, and changing the default initramfs compression algorithm to lz4 on all architectures.
Toolchain Upgrades 🛠️
Ubuntu 20.04 LTS comes with refreshed state-of-the-art toolchain including new upstream releases of glibc 2.31, ☕ OpenJDK 11, rustc 1.41, GCC 9.3, 🐍 Python 3.8.2, 💎 ruby 2.7.0, php 7.4, 🐪 perl 5.30, golang 1.13.
Ubuntu Desktop
New graphical boot splash (integrates with the system BIOS logo).
Refreshed Yaru theme 🎨
Light/Dark theme switching
GNOME 3.36
New lock screen design.
New system menu design.
New app folder design.
Smoother performance, lower CPU usage for window and overview animations, JavaScript execution, mouse movement and window movement (which also has lower latency now).
10-bit deep colour support.
X11 fractional scaling.
Mesa 20.0 OpenGL stack
BlueZ 5.53
PulseAudio 14.0 (prerelease)
With this Ubuntu release, netplan.io has grown multiple new features, some of which are:
Basic support for configuring SR-IOV network devices. Starting with netplan.io 0.99, users can declare Virtual Functions for every SR-IOV Physical Function, configure those as any other networking device and set hardware VLAN VF filtering on them.
Support for GSM modems via the NetworkManager backend via the modems section.
Adding WiFi flags for bssid/band/channel settings.
Adding ability to set ipv6-address-generation for the NetworkManager backend and emit-lldp for networkd.
Storage/File Systems
Continuing with what started in the Eoan release, Ubuntu Focal ships zfs 0.8.3. Compared to what was available in the previous LTS release, zfs 0.8 brings many new features. Highlights include:
Native Encryption (with hardware acceleration enabled in Focal)
Device removal
Pool TRIM
Sequential scrub and resilver (performance)
Upstream 0.8.0 release notes: https://github.com/openzfs/zfs/releases/tag/zfs-0.8.0
Also checkout 0.8.1, 0.8.2 and 0.8.3 for more details.
Other base system changes since 18.04 LTS
Python3 by default
In 20.04 LTS, the python included in the base system is Python 3.8. Python 2.7 has been moved to universe and is not included by default in any new installs.
Remaining packages in Ubuntu which require Python 2.7 have been updated to use /usr/bin/python2 as their interpreter, and /usr/bin/python is not present by default on any new installs. On systems upgraded from previous releases, /usr/bin/python will continue to point to python2 for compatibility. Users who require /usr/bin/python for compatibility on newly-installed systems are encouraged to install the python-is-python3 package, for a /usr/bin/python pointing to python3 instead.
Due to this transition the legacy python and python-minimal packages might be removed during an upgrade, being replaced by the python2 and python2-minimal packages as dependencies of the python-is-python2 package.
The Snap Store (snap-store) replaces ubuntu-software as the default tool for finding and installing packages and snaps.
The live server installer is now the preferred media to install Ubuntu Server on all architectures.
Besides architecture support, the main user visible new features are support for automated installs and being able to install the bootloader to multiple disks (for a more resilient system).
There have been many other fixes under the hood to make using encryption easier, better support installing to multipath disks, more reliable installation onto disks that have been used in various ways and allowing failures to be reported more usefully.
QEMU was updated to 4.2 release. There is so much that it is hard to select individual improvements to highlight, here just a few:
free page hinting through virtio-balloon to avoid migrating unused pages which can speed up migrations
PPC: NVIDIA V100 GPU/NVLink2 passthrough for spapr using VFIO PCI
Many speed improvements for LUKS backend
pmem/nvdimm support
…
Therefore please see the full change logs 4.2 and 4.1 for major changes since Ubuntu 19.10.
For Upgraders from Ubuntu 18.04 please also check out 4.0, 3.1, 3.0 and 2.12.
When upgrading it is always recommended to upgrade the machine types allowing guests to fully benefit from all the improvements and fixes of the most recent version.
UPGRADING FROM 19.10
For trimmed down container like isolation use-cases the new qemu has the microvm machine type which can be combined with the qboot ROM (available as bios-microvm.bin) to provide a reduced feature set at a much faster startup time. To further emphasize that you can use the package qemu-system-x86-microvm which provides an alternative QEMU binary stripped of all features not needed these use cases as sugegsted by the qboot ROM.
The VMX related features can now be controlled individually instead of just vmx on/off. Due to that the VMX-subfeatures of certain CPU types might have slightly changed (matching those of the selected CPU type now instead of almost randomly depending on the underlying hardware). In general it is – and always was – recommended to use a well defined cpu type when defining a guest, this is also what almost all higher level management tools from virt-manager to openstack will do. But if you want the most generic and compatible cpu but also enable VMX please use the type kvm64 instead of qemu64 now.
People that like to work or experiment with nvdimms and persistent memory QEMU now has pmem and nvdimm support enabled in Ubuntu Focal Fossa.
UPGRADING FROM 18.04
QEMU now has virglrenderer enabled which allows to create a virtual 3D GPU inside QEMU virtual machines. That is inferior to GPU passthrough, but can be handy if the platform used lacks the capability for classic PCI passthrough as well as more modern mediated devices.
The graphical QEMU back-end is now based on GTK instead of SDL. That provides much better Desktop integration and is often faster.
libvirt
libvirt was updated to version 6.0. See the upstream change log for details since version 5.6 that was in Ubuntu 19.04 or further back since verison 4.0 that was in Ubuntu 18.04.
UPGRADING FROM 19.10
Among many improvements worth to mention might be the features:
to access NVMe disks directly now allowing a speed oriented setup that still supports migration.
Mediated GPU devices are now supported as boot display.
Support kvm-hint-dedicated performance hint allowing the guest to enable optimizations when running on dedicated vCPUs
…see the detailed changelog linked above for much more
UPGRADING FROM 18.04
Worth mentioning is that libvirt can now enable QEMUs ability to use parallel connections for migration which can help to speed up migrations if one doesn’t saturate your network yet.
Administrators might like the ease of a new local include apparmor to the libvirt-qemu profile that allows local overrides for special devices or paths matching your setup without conffile delta that has to be managed on later upgrades.
Added the ability to have GL enabled graphics as well as mediated devices to be configured while still being guarded by custom apparmor profiles generated per guest. This is required for the use of gpu based mediated devices as well as VirGL mentioned above in the qemu section.
TRANSITION LIBVIRT-BIN -> LIBVIRT-CLIENTS / LIBVIRT-DAEMON / LIBVIRT-DAEMON-SYSTEM
Already in Ubuntu 18.04 the package was split from an almost single monolithic package libvirt-bin into three main components:
libvirt-daemon-system – system integration of the daemon with config and systemd service files (this is the most similar single package to the old libvirt-bin)
libvirt-clients – cli tools to interact with libvirt like virsh
libvirt-daemon – just the libvirt daemon, without services/configuration
In a similar fashion rarely used and less supported sub-features like virtualbox and xen control, as well as uncommon storage options are broken out into various libvirt-daemon-driver-* packages. That allows to reduce the install footprint and active code in the majority of installations.
Packages and project had plenty of time to transition, so now the empty compatibility package libvirt-bin that was pulling in libvirt-daemon-system + libvirt-clients was finally dropped. If you happen to have scripts or third party components referring to the old name use the list above to select which new package makes most sense to you.
dpdk
Ubuntu 20.04 LTS includes the latest stable release 19.11.1 of the latest LTS series 19.11.x. The very latest (non-stable) version being 20.02 was not chosen for downstream projects of DPDK (like Open vSwitch) not being compatible yet.
See the 19.11 and 19.11.1 release notes for details.
UPGRADING FROM 18.04
DPDK dependencies were reorganized into more or less common/tested components. Due to that most DPDK installations will now have a smaller installation footprint and less potentially active code to care about.
Open vSwitch
Open vSwitch has been updated to 2.13.
Please read the 2.13 release notes for more detail.
Upgraders from 18.04 might also want to take a look at release notes of:
Chrony
Chrony been updated to version 3.5 which provides plenty of improvements in accuracy and controls. Furthermore it also adds additional isolation for non-x86 by enabling syscall filters on those architectures as well.
To further allow feeding Hardware time into Chrony the package GPSD is now also fully supported.
But still for simple time-sync needs the base system already comes with systemd-timesyncd. Chrony is only needed to act as a time server or if you want the advertised more accurate and efficient syncing.
cloud-init
Cloud-init was updated to version 20.1-10. Notable features include:
CLOUD PLATFORM FEATURES
New datasource detection/support: e24cloud, Exoscale, Zstack
Azure dhcp6 support, fix runtime error on cc_disk_setup, add support for byte-swapped instance-id
EC2: render IPv4 and IPv6 network on all NICs, IMDSv2 session-based API tokens and add secondary IPs as static
Scaleway: Fix DatasourceScaleway network rendering when unset
LRU cache frequently used utils for improved performance
Drop python2 support
NETWORKING FEATURES
Prioritize netplan rendering above /etc/network/interfaces even when both
are present
Read network config from initramfs
net: support network-config:disabled on the kernel commandline
Add physical network type: cascading to openstack helpers
net/cmdline: correctly handle static ip= config
CONFIG MODULE FEATURES
distros: drop leading/trailing hyphens from mirror URL labels
cc_disk_setup: add swap filesystem force flag
cloud-init query surfaces merged_cfg and system_info dicts for use in
Jinja templated cloud-config when opinionated based on series, platform
use SystemRandom when generating random password.
PHP 7.4
PHP 7.4 is a new feature update, bringing typed properties, arrow functions, weak references, and unpacking inside arrays among other things. For more information on the new features and improvements, see the PHP 7.4 Release Announcement.
For more details about deprecated functionality, and suggested replacements, see the PHP 7.4 Deprecated Features page. Migration guides to 7.4 from 7.3 or earlier versions of PHP are also available in the PHP Manual. Users coming from Ubuntu 18.04 will be moving from 7.2 to 7.4, so should also refer to the Migration guides to 7.3 from 7.2.
Ruby 2.7
The default Ruby interpreter was updated to version 2.7. It comes with some nice features and improvements like: Pattern Matching, REPL improvement, Compaction GC, Separation of positional and keyword arguments and much more. To have a broad overview about the cool features and improvements check the Ruby 2.7 Release Announcement.
Users coming from previous Ubuntu releases (from 18.04 on) will be moving from Ruby 2.5 to 2.7, in this case the Ruby 2.6 Release Announcement might be useful as well. An important thing to keep in mind is that some libraries are not bundled anymore in Ruby. If you need them please install them separately:
CMath
Scanf
Shell
Synchronizer (ruby-sync)
ThreadsWait (ruby-thwait)
E2MM (ruby-e2mmap)
For more information check out this blog post.
Ruby on Rails 5.2.3
Ruby on Rails was updated to version 5.2.3. From users coming from Ubuntu 18.04 is a major change, moving from version 4.2.10 to 5.2.3. Some highlights are: addition of Action Cable framework, option to create slimmed down API only appli cations, Active Record attributes API and so on. Check the Ruby on Rails 5 and 5.2 Release Notes for an overview.
If you need to upgrade your Ruby on Rails application please take a look at the upstream upgrading guide.
Ubuntu HA/Clustering
KRONOSNET
kronosnet (or knet for short) is the new underlying network protocol for Linux HA components (corosync), that features the ability to use multiple links between nodes, active/active and active/passive link failover policies, automatic link recovery, FIPS compliant encryption (NSS and/or OpenSSL), automatic PMTUd and in general better performance compared to the old network protocol.
Main NEW features:
Up to 8 links dynamically reconfigured without restart of corosync
MTU auto-configuration
Support for NSS or OpenSSL encryption of packets
Compression
Higher throughput and lower latency
Support for RDMA and Upstart is gone
COROSYNC
From Corosync 3 release notes:
Corosync 3.0 contains many interesting features mostly related to usage of Kronosnet (https://kronosnet.org/) as a default (and preferred) network transport.
PACEMAKER
From Pacemaker 2.0 release notes:
The main goal of the 2.0 release was to remove support for deprecated syntax, along with some small changes in default configuration behavior and tool behavior. Highlights: Only Corosync version 2 and greater is now supported as the underlying cluster layer. Support for Heartbeat and Corosync 1 (including CMAN) is removed.
Rolling upgrades from Pacemaker versions earlier than 1.1.11 are not possible, even if the underlying cluster stack is corosync 2 or greater. Other rolling upgrades, from newer versions on top of corosync 2 or greater, should be possible with little to no change.
https://wiki.clusterlabs.org/wiki/Pacemaker_2.0_Configuration_Changes
https://wiki.clusterlabs.org/wiki/Pacemaker_2.0_Daemon_Changes
https://wiki.clusterlabs.org/wiki/Pacemaker_2.0_Tool_Changes
https://wiki.clusterlabs.org/wiki/Pacemaker_2.0_API_Changes
RESOURCE AGENTS
Cluster Resource Agents (RAs), compliant with the Open Cluster Framework (OCF) specification, used to interface with various services in a High Availability environment managed by the Pacemaker resource manager.
Complete Changelog:
https://github.com/ClusterLabs/resource-agents/blob/master/ChangeLog
FENCE AGENTS
Fence Agents is a collection of scripts to handle remote power management for several devices. They allow failed or unreachable nodes to be forcibly restarted and removed from the cluster.
KEEPALIVED
Failover and monitoring daemon for LVS clusters, used for monitoring real servers within a Linux Virtual Server (LVS) cluster. It can be configured to remove real servers from the cluster pool if they stop responding, as well as send a notification email to make the admin aware of the service failure.
isc-kea 1.6 stable track
Even though it’s a Universe package, isc-kea is a promising new dhcp server from the same upstream that created Bind and isc-dhcp. For Focal, we updated it to the 1.6.x stable series.
Upstream 1.6.0 release notes: https://downloads.isc.org/isc/kea/1.6.0/Kea160ReleaseNotes.txt
Upstream 1.6.2 release notes (version currently in Focal): https://downloads.isc.org/isc/kea/1.6.2/Kea162ReleaseNotes.txt
Bind 9.16
Bind has been updated to the new stable release series from upstream: 9.16.x.
Important packaging changes are:
no -dev package at the moment, as upstream discourages linking with its libraries. See a bit of a discussion about that here: https://gitlab.isc.org/isc-projects/bind9/-/merge_requests/3089#note_111299. Debian just added the dev package back (2020-04-16), we might follow with an SRU: https://bugs.debian.org/954906
bind-libs 9.11.x package: used for software projects that do not yet work with the new 9.16 version, like isc-dhcp.
bind-dyndb-ldap has not yet been ported to bind9 9.16.x
geoip legacy support was removed and replaced with geoip2 (libmaxminddb)
Upstream blog post about major changes in bind9 9.16.0: https://www.isc.org/blogs/bind9.16.0_released/
More detailed release notes: https://downloads.isc.org/isc/bind9/9.16.0/RELEASE-NOTES-bind-9.16.0.html
Presentation about the development of bind9 culminating in this new release: https://youtu.be/5math9Oy97s?t=46
OpenSSH updates with U2F Support
OpenSSH 8.2 added support for U2F/FIDO hardware devices to allow easy hardware-based two factor authentication. It is as simple as:# plug device in and: $ ssh-keygen -t ecdsa-sk Generating public/private ecdsa-sk key pair. You may need to touch your authenticator to authorize key generation. <– touch device Enter file in which to save the key (/home/ubuntu/.ssh/id_ecdsa_sk): Enter passphrase (empty for no passphrase): Enter same passphrase again: Your identification has been saved in /home/ubuntu/.ssh/id_ecdsa_sk Your public key has been saved in /home/ubuntu/.ssh/id_ecdsa_sk.pub The key fingerprint is: SHA256:V9PQ1MqaU8FODXdHqDiH9Mxb8XK3o5aVYDQLVl9IFRo ubuntu@focal
Now just transfer the public part to the server to ~/.ssh/authorized_keys and you are ready to go:$ ssh -i .ssh/id_ecdsa_sk ubuntu@focal.server Confirm user presence for key ECDSA-SK SHA256:V9PQ1MqaU8FODXdHqDiH9Mxb8XK3o5aVYDQLVl9IFRo <– touch device Welcome to Ubuntu Focal Fossa (development branch) (GNU/Linux 5.4.0-21-generic x86_64) (…) ubuntu@focal.server:~$
![]() If you don’t see the prompt asking for the user presence confirmation, then you are affected by
If you don’t see the prompt asking for the user presence confirmation, then you are affected by
– block-discover supports multipath discovery – vmtest add ppc64le/arm64 architectures
Upstream development of OpenSSH 8.2 in Debian has added support for an ‘Includes’ keyword in configuration files. This allows including additional configuration files via glob(3) patterns. By default the system sshd config (/etc/ssh/sshd_config) now includes files under /etc/ssh/sshd_config.d/*.conf. For each keyword encountered in configuration files, the first obtained value will be used. This is used in various Cloud Images to apply cloud-specific tuning while avoiding debconf prompts on package upgrade.
The effective configuration of sshd can be validated by running ‘sudo sshd -T’. This reads and validates the config file(s) and prints the effective configuration before exiting.
See the upstream release notes for more details: https://www.openssh.com/txt/release-8.2
HAProxy 2.0
First introduced in Ubuntu Eoan 19.10, HAProxy in Focal is tracking the upstream LTS 2.0 branch. This series has many new features when compared to the previous 1.8 stable branch, and all are detailed in this blog post: https://www.haproxy.com/blog/haproxy-2-0-and-beyond/
Apache, TLSv1.3, client cert auth
Apache has been built with TLSv1.3 support, and depending on the server configuration, this might require clients performing certificate authentication to support Post Handshake Authentication (PHA). Not all TLSv1.3 capable clients can perform PHA, and will fail. Telltale signs of this being the error include these messages in the Apache server logs:AH: verify client post handshake AH10158: cannot perform post-handshake authentication SSL Library Error: error:14268117:SSL routines:SSL_verify_client_post_handshake:extension not received
In this case, if there is no updated client version, you should preferably disable TLSv1.3 on the affected client.
Chromium bug: https://bugs.chromium.org/p/chromium/issues/detail?id=911653
Firefox bug: https://bugzilla.mozilla.org/show_bug.cgi?id=1511989 (fixed, can be enabled by toggling security.tls.enable_post_handshake_auth)
python httplib should enable post-handshake authentication for TLS 1.3: https://bugs.python.org/issue37440
Samba 4.11
Focal ships with Samba 4.11.x which introduces a number of changes. Of note we have:
SMB1 disabled by default: can still be enabled via a /etc/samba/smb.conf config change;
python2 no longer supported
Detailed upstream release notes for 4.11.0 can be seen here: https://www.samba.org/samba/history/samba-4.11.0.html
PostgreSQL 12
Focal is shipping postgresql-12, which has many improvements:
improved query performance, particularly over larger data sets
SQL/JSON path expression support
generated columns
pluggable table storage interface
Upstream announcement: https://www.postgresql.org/about/news/1976/
Upstream release notes: https://www.postgresql.org/docs/12/release-12.html
nginx
Starting in Focal Fossa, nginx-core no longer ships with the legacy geoip module enabled by default. If you are using the legacy geoip module in nginx, you may run into upgrade issues if you do not deactivate the geoip module in your configuration. This was done as part of the deprecation of GeoIP legacy support.
Here are some scenarios you might encounter:
Since nginx-core dropped the dependency on libnginx-mod-http-geoip, an “apt autoremove” might suggest that libnginx-mod-http-geoip can be removed. If this happens, and there are still geoip configuration directives, nginx will fail to restart. Note that this would also happen had we replaced libnginx-mod-http-geoip with libnginx-mod-http-geoip2, as the configuration directives are different
If someone has just main enabled, with nginx-code and libnginx-mod-http-geoip installed, and release upgrades to focal, libnginx-mod-http-geoip won’t be updated because it’s in focal/universe.
Squid 4.x
When upgrading from the previous LTS Ubuntu Bionic 18.04, the squid proxy cache will be at version 4. Among other changes, if you used custom logging format, be aware the redefining the build-in formats no longer works (upstream bug: https://bugs.squid-cache.org/show_bug.cgi?id=4905).
For example, if you were redefining the squid log format to change the timestamp, like this:logformat squid %tg{%F %H:%M:%S %z} %6tr %>a %Ss/%03>Hs %<st %rm %ru %[un %Sh/%<a %mt
You now have to use another name, and specify that it should be used, like this:logformat custom-squid %tg{%F %H:%M:%S %z} %6tr %>a %Ss/%03>Hs %<st %rm %ru %[un %Sh/%<a %mt access_log daemon:/var/log/squid/access.log custom-squid
s390x
IBM Z and LinuxONE / s390x-specific enhancements since 19.10 (partly not limited to s390x):
Starting with Ubuntu Server 20.04 LTS the architectural level set was changed to z13 (1836907). This has a significant impact: Ubuntu Server for s390x now benefits from improved and more instructions that got introduced with z13 hardware; at the same time support for zEC12/zBC12 got dropped and the minimum supported hardware is now IBM z13 and LinuxONE Rockhopper (I) and LinuxONE Emperor (I).
Secure Execution, a Trusted Execution Environment (TEE) for IBM Z and LinuxONE is now supported. It required adaptations in the kernel (1835531), qemu (1835546) and s390-tools (1834534). It can only be used with IBM z15 and LinuxONE III. With Secure Execution (or the upstream name ‘protected virtualization’ aka ‘protvirt’) workloads can run virtualized in full isolation with protection for both internal and external threats, using hardware assisted key based encryption for the guest memory.
The toolchain was significantly upgraded to gcc 9.3 – making sure that fixes like (1862342) are included, even moved to gdb 9.1 (1825344), that includes latest s390x hardware support – similar with LLVM, that was upgraded to v10 (1853145), again to have the latest s390x hardware enhancements included (1853269).
The KVM virtualization stack got updated to qemu 4,2 and libvirt 6.0, and with that CPU model comparison and baselining got enabled (1853315), CCW IPL support added to qemu (1853316) and libvirt (1853317) and several issue fixed, like (1861125), (1867109) and (1866207). In addition KVM crypto pass-through is now included (1852737), (1852738) and (1852744).
Support for new CEX7S crypto express hardware (1853304) and (1856831) was added, as well as CPACF MSA 6 in-kernel crypto support for SHA3 (1853105) and a lot of CPACF crypto co-processor (largely assembly based) optimizations and fixes in OpenSSL (1853150) and (1853312), incl. but not limited to ECDSA.
Performance tests showed (1868113) that it is beneficial to use ‘Striding RQ’ with RoCE Express 2 and 2.1 PCIe cards (ConnectX-4) on IBM z14 and LinuxONE Rockhopper II / Emperor II and newer – but this is not the default. Hence if one has RoCE 2 or 2.1 hardware plugged in to such a system, the enablement of ‘Striding RQ’ should be considered, like: ‘ethtool –set-priv-flags rx_striding_rq on’. For the reason of persistence one may also create a service or udev-rule that sets this at boot time.
OpenStack Ussuri
Ubuntu 20.04 LTS includes the latest OpenStack release, Ussuri, as a preview with final release coming in the 20.04.1 LTS, including the following components:
OpenStack Identity – Keystone
OpenStack Imaging – Glance
OpenStack Block Storage – Cinder
OpenStack Compute – Nova
OpenStack Networking – Neutron
OpenStack Telemetry – Ceilometer, Aodh, Gnocchi, and Panko
OpenStack Orchestration – Heat
OpenStack Dashboard – Horizon
OpenStack Object Storage – Swift
OpenStack DNS – Designate
OpenStack Bare-metal – Ironic
OpenStack Filesystem – Manila
OpenStack Key Manager – Barbican
OpenStack Load Balancer – Octavia
OpenStack Instance HA – Masakari
Please refer to the OpenStack Ussuri release notes for full details of this release of OpenStack.
OpenStack Ussuri is also provided via the Ubuntu Cloud Archive for OpenStack Ussuri for Ubuntu 18.04 LTS users.
WARNING: Upgrading an OpenStack deployment is a non-trivial process and care should be taken to plan and test upgrade procedures which will be specific to each OpenStack deployment.
Make sure you read the OpenStack Charm Release Notes for more information about how to deploy Ubuntu OpenStack using Juju.
Ceph
Ceph was updated to the 15.2.1 release, Ceph Octopus. Please refer to the Ceph Octopus release notes for full details of this release.
This release of Ceph is also provided via the Ubuntu Cloud Archive for use with OpenStack Ussuri for Ubuntu 18.04 LTS users.
Cloud Images ☁
Amazon Web Services (AWS)
Amazon Machine Images (AMIs) have the ec2-instance-connect package installed and enabled by default starting in Focal. AWS’ Instance Connect feature uses AWS Identity and Access Management (IAM) policies and principals to control SSH access to your instances.
Google Compute Engine
The existing sshd config overrides that were written to /etc/ssh/sshd_config have been moved to /etc/ssh/sshd_config.d/50-cloudimg-settings.conf, see OpenSSH Includes Keyword above.
Microsoft Azure
Azure instances now use chrony to manage time synchronization, and they are configured by default to use highly accurate Stratum 1 devices hosted in the Azure cloud. See more information: Time sync for Linux VMs in Azure
The existing sshd config overrides that were written to /etc/ssh/sshd_config have been moved to /etc/ssh/sshd_config.d/50-cloudimg-settings.conf, see OpenSSH Includes Keyword above.
Vagrant
Vagrant boxes are 40G by default instead of 10G. (LP: #1580596)
Raspberry Pi
Since the release of Ubuntu 19.10 Raspberry Pi 32-bit and 64-bit preinstalled images (renamed to raspi) support the Raspberry Pi 4 platform out-of-the-box. With this, our images now support almost all modern flavors of the Raspberry Pi family of devices (Pi 2B, Pi 3B, Pi 3A+, Pi 3B+, CM3, CM3+, Pi 4B).
Known issues
As is to be expected, with any release, there are some significant known bugs that users may run into with this release of Ubuntu 20.04 LTS. The ones we know about at this point (and some of the workarounds), are documented here so you don’t need to spend time reporting these bugs again:
Installer and live session
Systems with an nVidia graphics card: These systems boot the live session by default with the open source video driver ‘nouveau’. On some hardware this driver may crash which results in a freeze of the graphical session of the installer. If it happens, on the boot menu, select a ‘Safe graphics mode’ entry. Then in the installer, on the ‘Preparing to install …’ page, select ‘Install third party software …’ and continue. This option will install the nVidia proprietary drivers on the target system. Upon installation the proprietary drivers for your card will be loaded and the graphical session should work properly with optimized drivers. (1871562)
Ubuntu now defaults to checking the integrity of the medium in use when booting into live sessions. This can be skipped by hitting Ctrl-C, but due to a bug the message that tells you to hit this key is not shown in some flavours. (bug 1870018)
When selecting to install 3rd party drivers there can be a long pause before the next step is available. (bug 1824905)
With certain Broadcom wireless cards if you choose to install third party software during the installation process your wifi will disconnect. (bug 1867465)
Distribution Upgrades
For Ubuntu 18.04 systems with clang-6.0 and pocl-opencl-icd it is not possible for the release upgrader to calculate the upgrade to Ubuntu 20.04. (bug 1886748) It is possible to workaround this by removing clang-6.0 or libomp5 and then upgrading.
Desktop
Fractional scaling does not work with the NVIDIA proprietary driver (bug 1870736, bug 1873403).
Automatic login does not work with the NVIDIA proprietary driver (bug 1845801).
After upgrading audio device selection in Settings is sometimes ignored (bug 1866194).
ZFS installation fails to boot if there are existing pools named bpool or rpool on a second drive (bug 1867007).
Due to database format changes fprintd will remove all saved fingerprints, please ensure you have another mechanism for logging in (http://launchpad.net/bugs/1865824).
Raspberry Pi
The Pimoroni Fan Shim for the Raspberry Pi 4 re-uses the serial console pins on the GPIO header to control its RGB LED. This results in “noise” on the serial line which stops u-boot during startup (as it thinks a key has been pressed). Adding enable_uart=0 to /boot/firmware/syscfg.txt disables the serial console permitting the boot sequence to complete (bug 1873520)
For 20.04.1 and later, HDMI is used for audio output by default if it is connected. To force output over the headphone jack, create a file called ‘.asoundrc’ in the user’s home directory with the following contents:
defaults.pcm.card 1 defaults.ctl.card 1
Official flavours
The release notes for the official flavors can be found at the following links:
Lubuntu https://lubuntu.me/focal-released/
Kubuntu https://wiki.ubuntu.com/FocalFossa/ReleaseNotes/Kubuntu
Ubuntu Budgie 19.10 Upgraders / 18.04 Upgraders
Ubuntu MATE https://ubuntu-mate.org/blog/ubuntu-mate-focal-fossa-release-notes/
Ubuntu Studio https://wiki.ubuntu.com/FocalFossa/ReleaseNotes/UbuntuStudio
Xubuntu https://wiki.xubuntu.org/releases/20.04/release-notes
Ubuntu Kylin https://www.ubuntukylin.com/news/2004ReleaseNotes-en.html
More information
Reporting bugs
Your comments, bug reports, patches and suggestions will help fix bugs and improve the quality of future releases. Please report bugs using the tools provided.
If you want to help out with bugs, the Bug Squad is always looking for help.
Participate in Ubuntu
If you would like to help shape Ubuntu, take a look at the list of ways you can participate at
https://community.ubuntu.com/contribute
More about Ubuntu
You can find out more about Ubuntu on the Ubuntu website and Ubuntu wiki.
To sign up for future Ubuntu development announcements, please subscribe to Ubuntu’s development announcement list at:
https://lists.ubuntu.com/mailman/listinfo/ubuntu-devel-announce
FocalFossa/ReleaseNotes (Utoljára brian-murray módosította 2020-09-21 23:26:46-kor.)
Ubuntu Studio – Disco Dingo 19.04 – Bionic Beaver 18.04

Disco Dingo 19.04
This is the latest regular release, which we (the Ubuntu Studio team) will be supporting for 9 months (until January 2020).
Checksums and alternative downloads: http://cdimage.ubuntu.com/ubuntustudio/releases/disco/release/
Release notes: https://wiki.ubuntu.com/DiscoDingo/ReleaseNotes/UbuntuStudio
This is the latest LTS-based regular release, which we (the Ubuntu Studio team) will be supporting until April 2021 with the Ubuntu Studio Backports PPA. The Backports PPA must be added to receive this extended support which would otherwise have ended January 2019.
64-bit 18.04 Torrent
32-bit 18.04 Torrent
64-bit 18.04 Direct
32-bit 18.04 Direct
Checksums and alternative downloads: http://cdimage.ubuntu.com/ubuntustudio/releases/bionic/release/
Release notes: https://wiki.ubuntu.com/BionicBeaver/ReleaseNotes/UbuntuStudio
System Requirements
The minimum of RAM required for Ubuntu Studio is 1 GB, but it is highly recommended that you have at least 4 GB, as some applications use up a lot of RAM. The minimum of disk space required is around 10 GB, but that is just for installing the system.
Try before Installing
The Ubuntu Studio ISO is a live image, which means you can boot it and use all the default applications without actually installing it. Just burn a DVD, or create a bootable USB stick and try it out.
Boot from DVD
Download the image above. Burn it to DVD using your favorite software. Information on burning to CD/DVD can be found here.
Make sure to set your BIOS to boot from CD/DVD. Information on troubleshooting booting from CD/DVD can be found here.
Boot from your newly burned DVD and follow the instructions.
Boot from USB Stick
There is a bug that affects creating USB installers for the 15.10 release, so using UNetbootin or the like might not work. On Linux systems one can use the command line tool dd or mkusb instead. What they do is basically copy the image as is, not only the files but also the filesystem, onto the USB stick. Sort of like burning a DVD.
For 16.04 and later though, you may follow these steps:
Download the image above. Use software like UNetbootin to create your bootable USB stick (included in Debian/Ubuntu repositories). If using Universal USB Installer, use version 1.9.0.8 or above.
Make sure to set your BIOS to boot from USB. Commonly, the USB stick is recognized as a bootable hard disk, and to boot from it, either set it first in the BIOS boot order, or find a way to select which device to boot from using a key stroke while starting the computer (not all motherboards support booting from USB stick. Also, not all USB stick are bootable). More information on this here.
Boot from your newly created bootable USB stick and follow the instructions.
Fresh Installation
A fresh installation from DVD is the recommended installation method. The DVD image is about 2.6 GB, and can either be burned to DVD, or used to create a bootable USB stick.
Check ISO for corruption using checksum
After downloading the ISO, make sure to check it for corruption. Several methods are available, we recommend using SHA256. Go to the download directory, and use the command line program sha256sum. The output should be identical to the respective checksum found at the link below the downloads above. Read more about checking SHA256 sums.
Using wireless while installing
If you are using wireless to connect to the internet, you may first want to boot into the live system, connect to the internet and install from there. There is a launcher for installing Ubuntu Studio on the desktop.
Notes on partitioning and dual booting
If you are intending to dual boot (keeping more than one operating system on the same computer), you will need to know how to partition manually. Otherwise, the default option presented during the installation is the best choice (will overwrite everything on the disk). Information on dual booting can be found here.
Android gyorsító

Egy okostelefon nem lehet elég gyors – azt hiszem ebben egyetérthetünk. Ha appok közt váltogatunk, megnyitunk, bezárunk új alkalmazásokat, értékes tizedmásodpercek veszhetnek el rohanó világunkban lavírozó életünkből. Ki szeret várni a Facebookra, miközben vár a villamosra? Pattanjon az az Instagram-fiók, de izibe! Csettintésre ugorjon a Snapchat!
A BGR-en olvastuk, most továbbadjuk azt az egyszerű kis trükköt, amivel szempillantás alatt előbukkan egy app ablaka, amint rábökünk az ikonjára az érintőképernyőn.
A lényeg, hogy amikor okoseszközünk megjeleníti az éppen futó appok ablakait, akkor a mozgást valamilyen szinten animálja, amihez értékes processzoridőt is pazarol. Na, erre nyilván az égvilágon semmi szükség ugyebár, szóval le kellene tiltani, hogy a telefonunk ne animáljon semmit egy app megnyitásakor.
Ehhez először fejlesztői üzemmódba kell lépnünk. Ezt eléggé el szokták dugni a gyártók, hogy a felhasználók nehogy valamit elrontsanak a telefonjukon, kicsit mis is óvatosságra intünk mindenkit, hogy az alábbiakon kívül ne matassanak mélyebben a fejlesztői menüben.
Szóval amennyiben Android 8.0-nál frissebb oprendszer fut a telefonon, lépjenek be a beállítások menübe, és ott legalul a telefon névjegyébe. A “szoftver adatai” pontban jön az izgalmas rész: bökjenek egymás után hétszer a “Build száma” mezőre. Ezzel aktiválhatják a titkos, fejlesztői üzemmódot.

Na most vissza a beállítások menübe, és legalul megjelenik a “Fejlesztői beállítások” (“Developer options”) lehetőség. Ebbe belépve egy hosszú listát találunk csupa érthetetlen és az alap felhasználó számára lényegtelen opcióval. Keressük ki valahol középtájt, esetleg kicsivel lentebb az “Ablakanimáció skálázása”, “Áttűnésanimáció skálázása” és “Animátor időtartamának skálázása” pontokat. Ezekkel tudjuk a cikk témájául szolgáló gyorsítást elérni.

A fenti három opcióban az alapérték 1x, azaz az animációk 100 százalékos sebességen futnak. Ezt kell átállítani 0,5x-re, hogy kétszer gyorsabb legyen, vagy leginkább kikapcsolni, hogy egyáltalán ne is legyen.
Ennyi az egész. Próbálják ki (de közben máshoz ne nyúljanak), bámulatos lesz az eredmény, mintha egy új telefont tartanának a kezükben.
- Open the Settings app
- If your handset runs Android 8.0+, tap System (skip this step if you’re on an earlier version of Android)
- Scroll down and tap About phone
- Scroll down again and tap Build number 7 times consecutively
- Window animation scale
- Transition animation scale
- Animator animation scale
60.000 szabadalmat tesz nyílt forráskódúvá a Microsoft

A Microsoft nemrég bejelentette, hogy a cég csatlakozik az ’Open Invention Network’-höz (OIN), avagy ’nyílt feltalálói hálózat’-hoz, egy olyan csoporthoz, mely egy licenszelési platformot biztosít a Linux és még 2400 más cég számára. Az OIN-ben egyéni fejlesztőktől kezdve igazi mammutcégekig mindenféle felállás megtalálható és a csoport maga azok kollekciója, akik a Linux rendszer rendelkezésére bocsátottak szabadalmakat, nyílt forráskódúvá téve azokat. Csatlakozása után a Microsoft-nak meg kell fogadnia, hogy a szabadalmak után nem indít pereket.
Nagy hír, hogy a Microsoft is csatlakozik ehhez a csoporthoz, hiszen sok Windows-exkluzív aspektus nehezen volt megvalósítható Linux rendszerek alatt, pedig szívesen láttuk volna őket. A fejlesztők azonban nem fognak unatkozni, hiszen több, mint 60.000 szabadalom/szabadalmaztatott kód áll a rendelkezésükre, hogy beépítsék azokat ilyen-olyan formában Linux rendszerekbe. Az OIN egyéb tagjai hozzáférhetnek a szabadalmak, patentek (tervrajzok) bármelyikéhez. Rendkívül kellemes hír ez azoknak a Linux és Android fejlesztőknek, akik korábban perek célkeresztjeibe kerültek lehetséges jogsértések miatt.
Miért jelentős még ez a lépés? Azért, mert a Microsoft nem fog többé részesedést szedni az Android alkalmazások készítőitől és forgalmazóitól, tehát egyrészt jól járnak a mobilos platformok, másrészt a Microsoft pénzügyei is vissza fognak esni (nem komoly mértékben, de kissé érezhetően). A Microsoft ennek ellenére azt állítja, hogy folytatni fogja a támogatását a Linux és Android platformoknak, hiszen nagyrészt a felhasználók és a vásárlók kérték ezt. Ezelőtt a Microsoft-nak egyébként látszólag olyan hírneve volt, hogy nem igazán hajlandó együttműködni a nyílt forráskódú kollektívával, azonban ezek a kétségek is eloszlani látszanak. A Microsoft úgy tűnik, hogy alátámasztja állítását, hogy támogatja a nyílt forráskódú, szabadon fejleszthető kollektívákat, mint amilyen a Linux közösség is.
A Linux egyébként már régóta alapul veszi rengeteg disztróban a Windows számos aspektusát. Az Ubuntu, mely a leghíresebb disztró, már szinte teljes mértékben vizuális alapú és szinte teljesen úgy működik, mint egy Windows operációs rendszer. A Linux-ot azonban azért szeretjük, mert vannak olyan disztrók is, melyek nagyrészt parancssor alapúak. Az egészben pedig az a legjobb, hogy minden nyílt forráskódú, tehát bárki számára elérhető!
Linux AIO Ubuntu 17.04

We are pleased to announce the new version of Linux AIO Ubuntu 17.04 release in our Primary branch.
It contains 32bit, 64bit and mix version of ISOs, with official, untouched Ubuntu, Kubuntu, Ubuntu GNOME, Ubuntu MATE, Ubuntu Budgie, Xubuntu and Lubuntu 17.04 releases.
Due to limitations on SourceForge servers (max 5GB file can be uploaded) we needed to split ISO files. This is done by archiving ISO with .7z archiver in two parts. You need to download both parts and then to extract them. For extracting these files all you need is to have .7z archiver installed on your computer.
Download links are in Download section of website.
Always check downloaded file with MD5.
As you see there is a new Ubuntu flavour Ubuntu Budgie.
If you like our project you can support it with Donations via paypall.
Beállítások migrálása Aptikkal Ubuntu alatt

Beállítások migrálása Aptikkal Ubuntu alattEbből a leírásból megtudhatod hogyan viheted át régi rendszeredről adataidat az újra. Az Aptik mentést készít a következő dolgokról:
-rendszer beállítások
-régi PPA tárolók
-szoftver csomagok
-alkalmazás beállítások
-témák
-felcsatolt eszközök információi
-felhasználói/csoport adatok
-Home könyvtár adatai
-ütemezett feladatok
Az Aptik működik a legtöbb Ubuntu alapú rendszeren, így pl. LinuxMint-en és az Elementary-n is. A telepítéshez nyitni kell egy Terminalt és beírni a következőket:
sudo apt-add-repository -y ppa:teejee2008/ppa
sudo apt-get update
sudo apt-get install aptik
Telepítés után elindíthatod a programot a menüből vagy Unity Dash-ból.


Ahogyan a képernyőképből is kitűnik, az Aptik felülete elég barátságos. Még egy linuxban kevésbé járatos ember is könnyedén használhatja. A mentés megkezdése előtt ki kell választani a mentés helyét.

Mentési helynek megadható egy tetszőleges mappa vagy külső meghajtó. Ha megvan a cél hely, akkor kattints a Backup gombra. A következő ablakban az Aptik listázza a mentésre kerülő tételeket. Kattints újra a Backup gombra. Az Aptik megkezdi a mentést a kiválasztott helyre.

Ha mindent egyszerre akarsz menteni, akkor kattints alul a One-click backup gombra.


A fentiekhez hasonlóan lehetőséged van egy elem visszaállítására a Restore gomb használatával.

Forrás:
Bejegyezte: ragazzo
HOWTO: Ubuntu on Windows

As announced last week, Microsoft and Canonical have worked together to bring Ubuntu’s userspace natively into Windows 10.
As of today, Windows 10 Insiders can now take Ubuntu on Windows for a test drive! Here’s how…
1) You need to have a system running today’s 64-bit build of Windows 10 (Build 14316).

2) To do so, you may need to enroll into the Windows Insider program here, insider.windows.com.

3) You need to notify your Windows desktop that you’re a Windows Insider, under “System Settings –> Advanced Windows Update options”

4) You need to set your update ambition to the far right, also known as “the fast ring”.

5) You need to enable “developer mode”, as this new feature is very pointedly directed specifically at developers.

6) You need to check for updates, apply all updates, and restart.

7) You need to turn on the new Windows feature, “Windows Subsystem for Linux (Beta)”. Note (again) that you need a 64-bit version of Windows! Without that, you won’t see the new option.

8) You need to reboot again. (Windows sure has a fetish for rebooting!)
9) You press the start button and type “bash”.

10) The first time you run “bash.exe”, you’ll accept the terms of service, download Ubuntu, and then you’re off and running!


If you screw something up, and you want to start over, simply open a Windows command shell, and run: lxrun /uninstall /full and then just run bash again.
For bonus points, you might also like to enable the Ubuntu monospace font in your console. Here’s how!
a) Download the Ubuntu monospace font, from font.ubuntu.com.

b) Install the Ubuntu monospace font, by opening the zip file you downloaded, finding UbuntuMono-R.ttf, double clicking on it, and then clicking Install.

c) Enable the Ubuntu monospace font for the command console in the Windows registry. Open regedit and find this key: HKEY_LOCAL_MACHINE\SOFTWARE\Microsoft\Windows NT\CurrentVersion\Console\TrueTypeFont and add a new string value name “000” with value data “Ubuntu Mono”

d) Edit your command console preferences to enable the Ubuntu monospace font.

Cheers!
Ubuntu futtatása Windows 10 alatt

1.) Először meg kell róla győződnöd, hogy 64 bites Windows 10-el rendelkezel.

2.) Részt kell venned a Windows Insider programban.

3.) A Windows asztalon meg tudsz a részvételről bizonyosodni a Rendszerbeállítások => Windows Update opciók menü alatt.

4.) Be kell állítanod a frissítést a beállító gyűrűn.

5.) Engedélyezned kell a “fejlesztői módot”, mert ez az új jellemző kifejezetten fejlesztők számára érhető el.

6.) Ellenőrizned kell a frissítéseket, fogadj el minden frissítést és indítsd újra a gépet.

7.) Be kell kapcsolnod az új Windows jellemzőt, “Windows System for Linux (beta). Ismét bizonyosodj meg arról, hogy 64 bites Windowst használ. Enélkül nem láthatod az új funkciót.

8.) Újra szükséges egy restart.
9.) Nyomd meg a Start gombot majd írd be, hogy “bash”.

10.) Amikor első alkalommal futtatod a bash.exe-t, akkor el kell fogadnod a felhasználási feltételeket, aztán már használhatod.


Forrás: http://blog.dustinkirkland.com/2016/04/howto-ubuntu-on-windows.html

